Build and Deploy an Nginx Load Balancing Infrastructure using Ansible and Vagrant


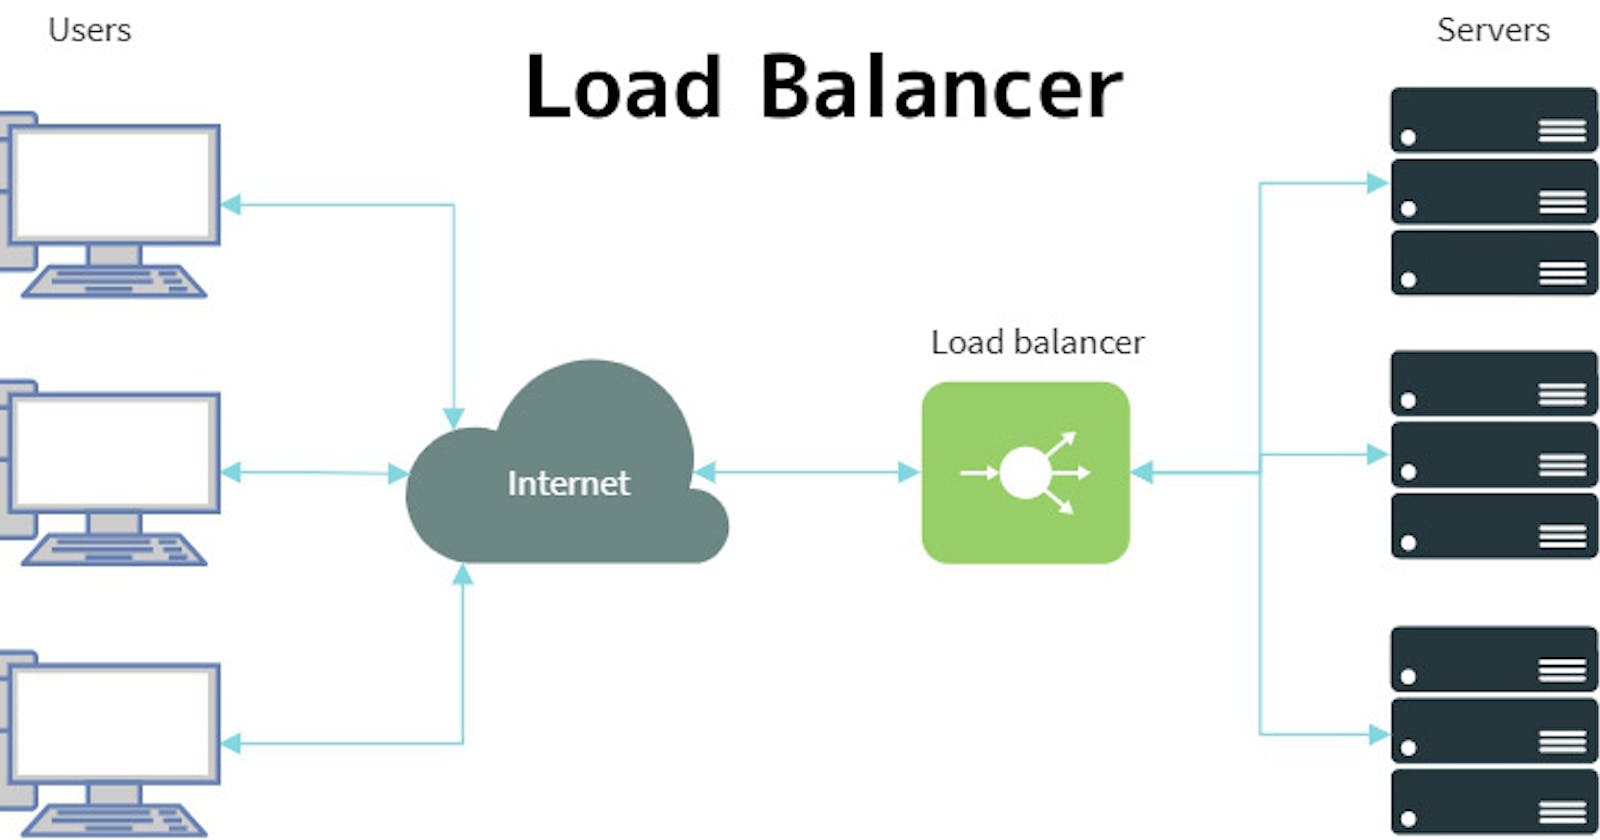
This article will walk you through building the infrastructure in the diagram below and deploying a simple python application.
Before we begin, let's get a quick understanding of what load balancing is.
In a hypothetical situation, you are contracted to build a web application for a small pizza delivery business. You do good work and the client is satisfied. The business gets very popular quickly causing a huge increase in the number of visits to the website, but the website suddenly begins to malfunction. After troubleshooting, you find out that the downtime is a result of the server's inability to handle the traffic surge. How do you fix this?
This is where load balancing comes in. The solution to this problem is to increase the number of servers so that instead of user requests hitting just one over and over, there's another server to handle the load too. Load balancers are servers that forward internet traffic to multiple servers. They distribute workload evenly across multiple servers to maximize speed and performance and prevent downtime. User requests go to the load balancer which then decides how to distribute the load across the servers.
Now let's dive in!
Setup requirements for your local machine:
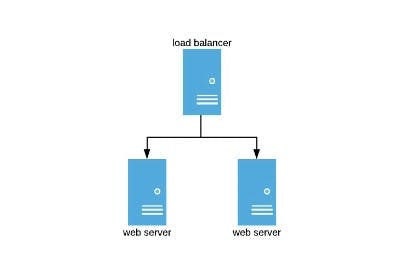
1) The first thing you need to do is create the virtual machines using vagrant. We will define three VMs for this infrastructure - the load balancer, server 1, and server 2. Create a Vagrantfile in your project directory.
$ touch Vagrantfile
We will use the ubuntu/bionic64 box for the three VMs. Put the following code in your Vagrantfile.
Vagrant.configure(2) do |config|

    config.vm.box = "ubuntu/bionic64"


    # configure loadbalancer
    config.vm.define "load-balancer" do |loadbalancer|
      loadbalancer.vm.network "private_network", ip: "192.168.33.11"
      loadbalancer.vm.hostname = "load-balancer"
      loadbalancer.vm.network "forwarded_port", guest: 80, host: 8080
      loadbalancer.vm.provider "virtualbox" do |vb|
        vb.memory = 512
        vb.customize ["modifyvm", :id, "--audio", "none"]
      end

    end


    #configure web servers

    config.vm.define "server-1" do |server_1|
      server_1.vm.network "private_network", ip: "192.168.33.12"
      server_1.vm.hostname = "server-1"
      server_1.vm.provider "virtualbox" do |vb|
        vb.memory = 512
        vb.customize ["modifyvm", :id, "--audio", "none"]
      end

    end


    config.vm.define "server-2" do |server_2|
      server_2.vm.network "private_network", ip: "192.168.33.13"
      server_2.vm.hostname = "server-2"
      server_2.vm.provider "virtualbox" do |vb|
        vb.memory = 512
        vb.customize ["modifyvm", :id, "--audio", "none"]
      end
   end


  # update the packages on the VMs
   config.vm.provision "shell", inline: <<-SHELL
      apt-get update

    SHELL

end
2) Next, launch the VMs. Open a terminal in your present working directory and run
$ vagrant up
3) Since we are using Ansible for configuration management, we need to write Ansible manifests to configure the VMs. These manifest files are written in a data serialization language called YAML and are called Playbooks. Create a folder in the directory called ansible.
$ mkdir ansible
4) Create an ansible.cfg file within the ansible folder. The ansible.cfg file contains Ansible's default configuration.
$ touch ansible.cfg
Now let's specify some default settings in the file
[defaults]
gathering = smart

host_key_checking = false

inventory = ./hosts   # the location of your hosts file
5) Ansible needs to know which hosts to use when running a playbook. Hosts are declared and grouped in a file that is known as the inventory. Create a hosts file within the ansible folder and put the hosts from the Vagrantfile created earlier along with their IP addresses in it.
$ touch hosts
server-1 ansible_host=192.168.33.12
server-2 ansible_host=192.168.33.13

load-balancer ansible_host=192.168.33.11
Put the hosts into groups
[webservers]
server-1
server-2

[loadbalancer]
load-balancer
There is a default group in Ansible called all that contains every host. We will use this group to define variables that we want to apply to all available hosts
[all:vars]
ansible_user=vagrant
ansible_ssh_pass=vagrant
ansible_python_interpreter=/usr/bin/python3
6) Now we create the playbooks.
First, create a general playbook that imports the other playbooks when referenced
$ touch site.yml
---
  - import_playbook: nginx_playbook.yml
  - import_playbook: webservers_playbook.yml
nginx_playbook.yml and webservers_playbook.yml will contain automation tasks for Nginx and the web servers respectively.
7) Create the webservers_playbook.yml file
$ touch nginx_playbook.yml
---
- hosts: all   #Apply these tasks to host group 'all'
  tasks:
  - name: Install pip
    apt:
       name: python3-pip
       state:  present
    become: yes

  - name: Install Flask
    command: pip3 install -U Flask
    become: yes

  - name: Create app  #Create a flask app in the home directory of the VMs
    become: yes
    copy:
      dest: "/home/vagrant/hello.py"
      content: |

        from flask import Flask

        app = Flask(__name__)


        @app.route('/')
        def index():

            return "Hello from IP"

        if __name__ == '__main__':
                    app.run(debug = True, host='0.0.0.0', port='5000')


  - name: Get IP and insert in the app   # "IP" in the flask app should be the host name of the server
    shell: sed -i "s/IP/$(hostname)/g" /home/vagrant/hello.py
    become: yes

  - name: Create a service for the app   #Create a service to start the flask application automatically
    become: yes
    copy:
      dest: "/etc/systemd/system/app.service"
      mode: 0664
      owner: vagrant
      content: |
        [Unit]
        Description=Flask application

        [Service]
        ExecStart=/usr/bin/python3 /home/vagrant/hello.py

        [Install]
        WantedBy=multi-user.target

  - name: Start app  #Start the application by running the service created earlier
    become: yes
    systemd:
      state: started
      daemon_reload: yes
      name: app.service
      enabled: yes
8) We need to create an Nginx configuration file that would tell the Nginx load balancer to balance the load between server-1 and server-2.
$ touch nginx.cfg
Write the configuration settings
upstream backend  {
  server 192.168.33.12:5000;  #server-1
  server 192.168.33.13:5000;  #server-2
}

server {
  listen 80;  #listen on port 80

  server_name web.app;
  location / {
    proxy_read_timeout 300s;
    proxy_pass  http://backend;  #pass all requests processed to the backend upstream servers
  }
}
9) Create the nginx_playbook.yml file to automate the load balancing tasks
$ touch nginx_playbook.yml
Put the following tasks in the nginx_playbook.yml file
---
- hosts: all
  tasks:
    - name: Ensure Nginx is installed and it is the latest version
      apt:
         name: nginx
         state: latest
      become: yes

    - name: Start Nginx
      service:
          name: nginx
          state: started
      become: yes

    - name: Copy the Nginx config file and restart nginx
      copy:
        src: ./nginx.cfg
        dest: /etc/nginx/sites-available/nginx.cfg
      become: yes

    - name: Create symlink
      file:
        src: /etc/nginx/sites-available/nginx.cfg
        dest: /etc/nginx/sites-enabled/default
        state: link
      become: yes

    - name: Restart nginx
      service:
        name: nginx
        state: restarted
      become: yes
10) The playbooks have been created, but to deploy the load balancer we need to provision Ansible in the Vagrantfile. We'll use the Ansible Provisioner for this.
Let's write the provisioning blocks
      loadbalancer.vm.provision "ansible" do |ansible|
        ansible.verbose = "v"
        ansible.playbook = "ansible/site.yml"
        ansible.become = true
        ansible.inventory_path = "ansible/hosts"
      end

      server_1.vm.provision "ansible" do |ansible|
        ansible.verbose = "v"
        ansible.playbook = "ansible/site.yml"
        ansible.become = true
        ansible.inventory_path = "ansible/hosts"
      end

      server_2.vm.provision "ansible" do |ansible|
        ansible.verbose = "v"
        ansible.playbook = "ansible/site.yml"
        ansible.become = true
        ansible.inventory_path = "ansible/hosts"
      end
Your final Vagrantfile should look like this
Vagrant.configure(2) do |config|

    config.vm.box = "ubuntu/bionic64"


    # configure loadbalancer
    config.vm.define "load-balancer" do |loadbalancer|
      loadbalancer.vm.network "private_network", ip: "192.168.33.11"
      loadbalancer.vm.hostname = "load-balancer"
      loadbalancer.vm.network "forwarded_port", guest: 80, host: 8080
      loadbalancer.vm.provider "virtualbox" do |vb|
        vb.memory = 512
        vb.customize ["modifyvm", :id, "--audio", "none"]
      end


      loadbalancer.vm.provision "ansible" do |ansible|
        ansible.verbose = "v"
        ansible.playbook = "ansible/site.yml"
        ansible.become = true
        ansible.inventory_path = "ansible/hosts"
      end

    end


    #configure web servers

    config.vm.define "server-1" do |server_1|
      server_1.vm.network "private_network", ip: "192.168.33.12"
      server_1.vm.hostname = "server-1"
      server_1.vm.provider "virtualbox" do |vb|
        vb.memory = 512
        vb.customize ["modifyvm", :id, "--audio", "none"]
      end


      server_1.vm.provision "ansible" do |ansible|
        ansible.verbose = "v"
        ansible.playbook = "ansible/site.yml"
        ansible.become = true
        ansible.inventory_path = "ansible/hosts"
      end

    end


    config.vm.define "server-2" do |server_2|
      server_2.vm.network "private_network", ip: "192.168.33.13"
      server_2.vm.hostname = "server-2"
      server_2.vm.provider "virtualbox" do |vb|
        vb.memory = 512
        vb.customize ["modifyvm", :id, "--audio", "none"]
      end


      server_2.vm.provision "ansible" do |ansible|
        ansible.verbose = "v"
        ansible.playbook = "ansible/site.yml"
        ansible.become = true
        ansible.inventory_path = "ansible/hosts"
      end
    end

   # update the packages on the VMs
    config.vm.provision "shell", inline: <<-SHELL
      apt-get update
    SHELL

end
11) Deploy the load balancer by running
$ vagrant up --provision
This will take a while.
Manual Tests
There are two ways to manually check that the load balancer is working correctly:
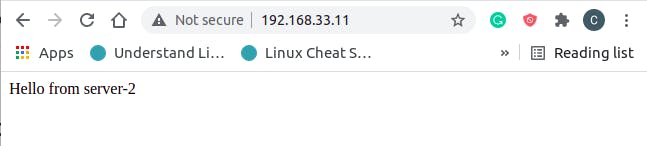
- Open a web browser on your machine go to the load balancer's IP address

The application is first served from server-1, and when refreshed server-2 responds.
This alternating method of load balancing is called the Round Robin technique
- Another way we can check that the load balancer works is to run the following command from the terminal
$ curl http://192.168.33.11
The response should alternate between server-1 and server-2

If these tests passed, congrats! you just deployed your first load balancer 🎉
Conclusion
In this tutorial, you learnt what load balancing is and how to build and deploy an Nginx load balancer using Ansible for configuration management.
Keep learning! 🤓